A photo lands in your group chat: a flooded high street, timestamped this morning, shared by someone who swears they were standing there. Before you squint at the pixels, open the file's metadata. Two hidden layers can settle the argument faster than your eyes ever will: EXIF, the record your camera writes automatically, and C2PA Content Credentials, a signed history of who made the file and what was done to it. Learning how to read image metadata takes about ten minutes. Learning what it actually proves takes longer, and that is the part most guides skip.
EXIF Is a Claim. C2PA Is a Claim You Can Check.
Start here, because everything else depends on it. EXIF (Exchangeable Image File Format) is metadata your camera writes into the file at the moment of capture: make and model, date and time, shutter speed, ISO, focal length, and, if location services were on, GPS coordinates. It sits inside the JPEG or HEIC as ordinary, unencrypted text. Any free tool can rewrite it, and most software that touches the image will quietly change parts of it.
C2PA is the newer layer, published by the Coalition for Content Provenance and Authenticity and shown to people under the name Content Credentials. Instead of loose fields, it embeds a signed manifest: who signed the file, which tool created it, what actions were taken (created, edited, generated with AI), and a cryptographic hash of the pixels themselves. Change one pixel and the hash stops matching, so the credential fails validation. That single difference, signing, is why the two layers deserve very different amounts of trust.
EXIF tells you what a file says about itself. C2PA tells you whether anyone is still willing to sign their name to that story.
How to Read Image Metadata in Under a Minute on Any Device
The fastest route is to drag the file into a browser-based metadata viewer and read the full dump. No install, no account, and the better ones process the file locally in your browser instead of uploading it anywhere. That matters when the image is sensitive.
If you would rather stay in the tools you already have: on Windows, right-click the file, choose Properties, then Details. On macOS, open it in Preview and press Command+I for the Inspector, where the camera and GPS tabs live. On an iPhone, open the photo, tap the info button, and swipe up for camera details and a location map. On Android, open Google Photos and swipe up on the image for the file details panel. Each of these shows a friendly subset of the data, which is exactly the problem: the fields most useful for verification are usually the ones your operating system decides you do not need to see.
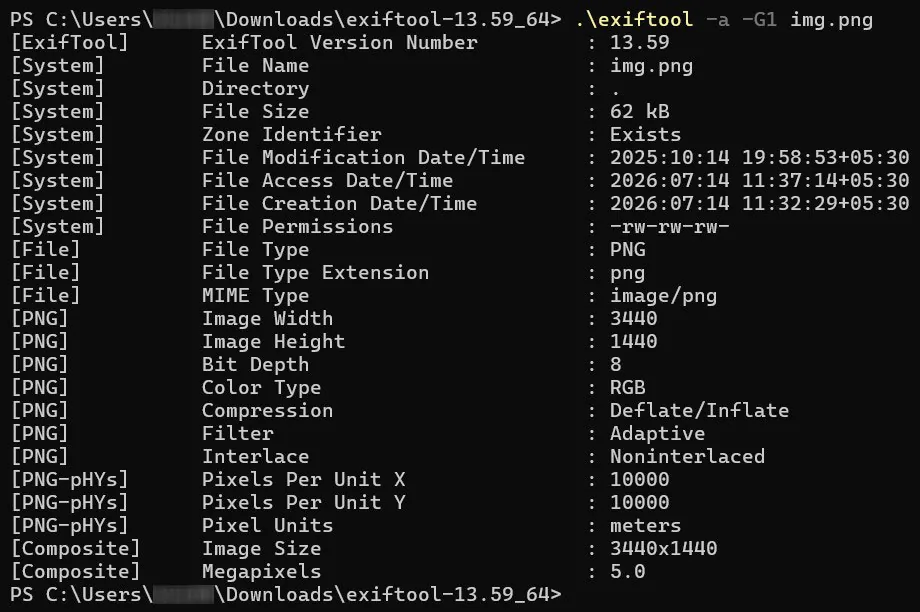
For anything you actually care about, use ExifTool. It is a free command line tool by Phil Harvey, it has been the standard in digital forensics for two decades, and it reads far more than EXIF: XMP, IPTC, maker notes, and C2PA data too. The command is short. Run exiftool -a -G1 photo.jpg and you get every tag it can find, duplicates included, grouped by where each tag lives. Then read all of it. The interesting material is rarely at the top.
The EXIF Fields Worth Reading First
Most people glance at the camera model, check the date, and stop. The verification value is not in any single field. It is in whether the fields agree with each other, so these are the ones to read first.
Make, Model, and Lens should be present in any real capture, alongside exposure values like ISO, aperture, and shutter speed. Software is the field people skip past: if it names Photoshop, Lightroom, GIMP, or a phone editor, the file has been re-saved by that program regardless of what the sender says. MakerNotes is a large proprietary block that camera manufacturers write and that fakers rarely bother to recreate, so its absence in a file claiming to come from a professional body is a quiet red flag.
Then read the clocks against each other. DateTimeOriginal is when the shutter fired, ModifyDate is when the file was last written, and FileModifyDate is when it last touched a disk. A three year gap between the first two proves nothing on its own, but it does mean the file has been through an editor, and it gives you a question worth asking. GPS fields, when present, give coordinates and sometimes altitude and heading. And the embedded thumbnail, a small preview the camera tucks inside the file, is worth extracting, because some editors forget to update it.
How to Read C2PA Content Credentials (Three Ways That Work)
Same file, different layer, about thirty seconds of work. The simplest route is the free Content Credentials Verify tool from the Content Authenticity Initiative: drop the image in and it validates the signature and lays out the recorded history. Adobe's Content Authenticity web app does the same job with more technical depth, including the full chain of edits and the certificate behind the signature.
The second route is a browser extension. Several exist, including one published by the C2PA project itself, and they add a small "CR" pin to any image on a page that carries credentials, so you can check as you browse. The third route is the command line. The open source c2patool prints the entire manifest as JSON, and ExifTool reads C2PA blocks alongside EXIF. One command, both layers, which is why it stays open in my terminal.
You will also start seeing credentials surfaced inside products you already use. LinkedIn displays the CR icon on images that carry one. Google has been surfacing provenance details for images in Search. Pictures generated by ChatGPT, Adobe Firefly, and Microsoft's image tools arrive with credentials stating plainly that AI made them. On the capture side, Leica, Sony, and Canon have shipped in-camera signing on selected bodies, and Google's Pixel 10 signs photos from its camera app by default.
What a Content Credential Proves, and What It Quietly Does Not
A valid credential proves two narrow things: the file has not changed since it was signed, and the signer is who the certificate says they are. That is the whole promise. It is a chain of custody, not a truth serum.
Run the check and you get one of four outcomes. Valid with a recognized signer: the manifest is intact and the certificate traces back to the C2PA trust list, so you know which camera, app, or company stands behind it. Valid with an unrecognized signer: structurally fine, but the signer is not on the trust list, which is common with test certificates and homegrown tools. No credentials found: by far the most common result, and it says nothing about the image. Invalid: the file was altered after signing, and this is the one result that should make you sit up.
Here is the limit almost nobody mentions. A C2PA camera will happily sign a photograph of a screen displaying an AI-generated image, and that credential will validate perfectly, because the camera really did capture those pixels at that moment. Provenance answers "where did this file come from," never "is the scene inside it real."
A valid Content Credential proves nobody has touched the file since it was signed. It does not prove the camera was pointed at the truth.
Why the Image You Downloaded Has No Metadata at All
Nine times out of ten, nothing sinister happened. The platform did it. Instagram, Facebook, X, TikTok, Reddit, and LinkedIn all re-encode uploaded images and strip EXIF out of the copy other people can download. That same re-encoding breaks the C2PA hash binding, so the signed history usually dies on upload too, even on platforms that display credentials when they survive.
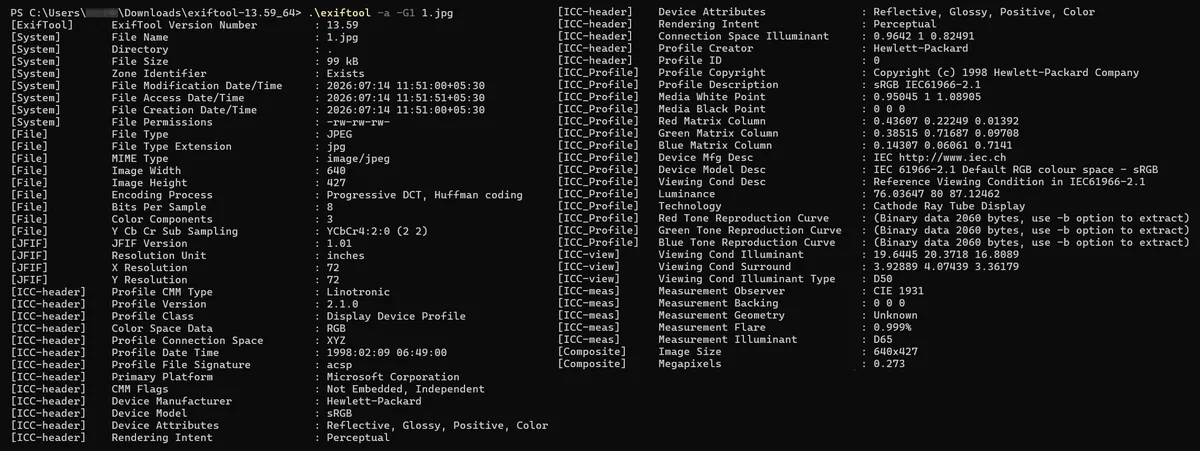
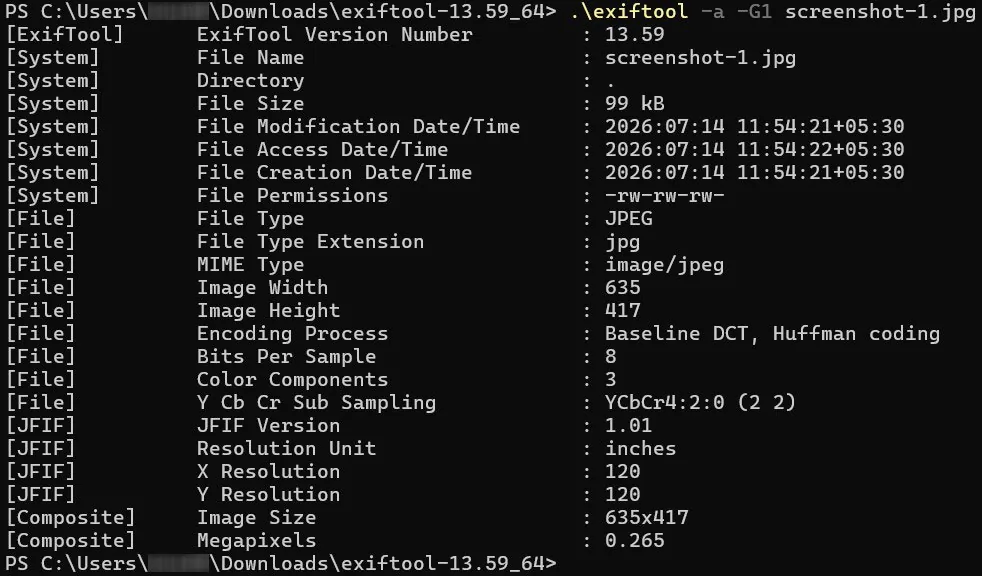
Screenshots are worse. A screenshot is not a copy of the original file, it is a brand new image of your screen, carrying your device's metadata and none of the original's. EXIF, credentials, compression history: all of it gone, replaced by facts about you. When someone sends a screenshot as evidence, they have sent you almost nothing.
The channels that preserve metadata are the private ones people assume are safest. Email attachments, iMessage, Slack, cloud storage links, AirDrop, and WhatsApp's document mode all tend to deliver the original file untouched, GPS and all. That is a privacy problem for the sender and a gift for anyone verifying. In my experience the useful files never come from a download button, they come from a sender who was asked politely to attach the original. Of the reader-submitted images we looked at recently, most arrived as screenshots with nothing left to read:
Metadata Lies Too: How to Spot Faked EXIF
EXIF can be rewritten in seconds. A single command changes the capture date, the camera model, or the GPS coordinates, and nothing inside the file objects. So never read one field and call it proof. Read the fields against each other, because forgeries are usually inconsistent in ways the forger never thought about.
The tells I look for: a camera model with no MakerNotes block, a supposed DSLR capture carrying no lens or exposure data, timestamps that contradict each other, a Software field naming an editor the sender never mentioned, image dimensions no version of the named camera has ever produced, and an embedded thumbnail that does not match the visible photo. That last one is old and still works. Run exiftool -b -ThumbnailImage photo.jpg > thumb.jpg, open the result, and compare. Any one of these tells can have an innocent explanation. Three together rarely do.
Metadata is one instrument, and it is the easiest one to tamper with, so pair it with a pixel-level test. Error level analysis reads compression artifacts and shows where a JPEG has been re-saved unevenly, which is the kind of trace an edit leaves behind even when the metadata looks spotless. You can run both checks on the same file with the free detector on this site: upload an image and read the metadata and the ELA pass side by side, then see whether the two stories agree.
The Trust Ladder: Rank Your Evidence Before You Believe It
Once you can read both layers, the actual skill is weighting them. Here is the ladder I use, from weakest to strongest. It is the part of this job that no tool does for you.
A screenshot or a social media download tells you nothing about origin. Plain EXIF that happens to match the story is weak corroboration, because writing it takes one command. Internally consistent EXIF, with maker notes present, lens and exposure data intact, timestamps that agree, and a thumbnail that matches, means something, because faking all of it coherently is real work. A valid Content Credential from an unrecognized signer confirms the file has not been altered since somebody signed it, but not who that somebody is.
A valid Content Credential from a recognized signer, whether a camera manufacturer, Adobe, OpenAI, or a newsroom, is the strongest technical signal available today, and it still only speaks to provenance. Above all of it sits the unglamorous step professional fact-checkers do first: get the original file from a named source, then check the picture against the world with a reverse image search and the reporting around it. Metadata is a witness. It is not the jury.
A Five Minute Workflow for Any Suspicious Image
Put it together and the whole check is quick. One: get the original file, attached or downloaded from the source, never a screenshot. Two: read the full metadata dump rather than the tidy summary your operating system offers. Three: compare the timestamps, the Software field, and the GPS against the claim being made about the photo.
Four: run the same file through a Content Credentials verifier and note which of the four outcomes you get. Five: run a pixel-level check like error level analysis, so a clean metadata record cannot fool you by itself. Six: reverse image search the picture, because a photo that first appeared online in 2019 cannot be from this morning, whatever the file claims. Then write one line describing what you can support and what you are assuming. That line is the entire point of the exercise.
Questions People Ask About Reading Image Metadata
Can EXIF data be faked?
Does a missing Content Credential mean an image is fake or AI-generated?
Do screenshots keep any of the original metadata?
Can I read image metadata on my phone without installing anything?
What to Do With the Next Image That Looks Off
Reading metadata is a ten minute skill with a long tail of judgment attached. The mechanics are easy: a viewer, a verifier, and the habit of reading every field instead of the two you went looking for. The judgment is remembering that EXIF is a claim, a Content Credential is a signed claim, and neither one tells you whether the photograph is honest.
So try it on something real. Take the last image that made you pause, get hold of the original file instead of the screenshot, and run it through the free detector on this site. You will see the metadata read and an error level analysis pass on the same screen, which is exactly the cross-check this article has been arguing for. Whatever you find, you will know more about that image than the person who forwarded it to you.