A dramatic photo can change what you believe before you have even read the headline. Give yourself three minutes before sharing it, and you can catch a surprising number of misleading images without turning every trip through your news feed into a research project. The trick is not memorizing dozens of AI glitches. It is building a small routine you can repeat every day. This guide shows you how to build a 3-minute daily habit for spotting fake news photos, from the first pause to the final decision about whether an image is safe to trust and share.
Why a three-minute habit works better than occasional fact-checking
The biggest problem with image verification is not that the tools are too complicated. It is that most people only think about verification after they have already reacted to an image. A shocking photograph appears, your brain forms an opinion, and your thumb moves toward Share. By the time you start asking questions, the emotional part of the decision has already happened.
A daily habit changes that order. Instead of waiting for an image to become obviously suspicious, you spend three minutes deliberately checking one photo every day. Over time, the questions become automatic: Who posted this? What does it claim to show? Has this picture appeared somewhere else? Does the file contain anything useful? Is there a reason to doubt the image itself, or is the real problem the caption?
That last question matters more than it sounds. A photograph does not have to be edited to spread misinformation. A real picture from a different country, a different year, or a completely different event can become a false news photo simply because someone changed the context.
The habit is not about learning to spot every fake. It is about learning to pause before a photo makes the decision for you.
You also do not need to verify every photograph you see. Your three minutes are best spent on images that make a strong claim, trigger a strong emotional reaction, or seem unusually important. A picture claiming to show a breaking political event, disaster, crime, military incident, celebrity moment, or shocking scientific discovery deserves more attention than a random landscape photo in your feed.
The first 30 seconds: stop the emotional reaction
Your first job is surprisingly simple: do nothing. Do not share the image, do not quote it to a friend, and do not decide that it must be fake just because something feels strange. Give yourself about 30 seconds to separate the photograph from the reaction it created.
Ask one question: "What exactly is this image supposed to prove?" Be specific. "This is a horrible photo" is not a claim you can verify. "This photo shows flooding in London today" is. "This is the politician at the scene yesterday" is. "This product photo shows what the customer actually received" is.
Once you have stated the claim, look at the image again without the caption. Does the picture itself contain clues about the location, date, people, weather, buildings, signs, clothing, vehicles, or event? You are not trying to solve the mystery yet. You are separating what you can actually see from what someone wants you to believe.
The next 60 seconds: check the source and context
Now look at where the image came from. A social media post is not the same thing as the original source. A repost may have removed the photographer's name, changed the caption, cropped the image, or added text that was never part of the original.
Start with the account or page that posted it. Is it an established news organization, a named journalist, an eyewitness, an anonymous account, or an account that mainly reposts viral material? None of those categories automatically proves an image is real or fake, but they tell you how much context you should expect to find.
Then read beyond the caption. If someone claims that a photograph shows an event happening today, look for the date and location. If the post names a city, check whether the visible environment makes sense. A recognizable road sign, storefront, language, license plate style, landmark, sports jersey, or weather condition can sometimes tell you more than the caption.
Do not make the common mistake of treating repetition as verification. Ten accounts sharing the same photograph do not create ten independent confirmations if they all copied the same original post. You want an independent source that can establish where and when the image came from.
For major breaking events, compare the claim against established reporting from organizations that were actually covering the event. If the image supposedly shows a major incident but the only evidence is a screenshot circulating through social media, that is a reason to investigate further.
The next 60 seconds: trace the image backward
If the image is making an important claim, reverse image search is usually the most useful next move. Instead of asking whether the picture looks real, you ask a much better question: where has this image appeared before?
That distinction is powerful because many misleading news photos are authentic photographs used with false context. An old photograph can be presented as breaking news. A picture from one country can be presented as another. A staged promotional image can be described as an eyewitness photograph. None of those problems requires Photoshop.
Open a reverse image search tool and upload the clearest copy you have. If the image contains several unrelated elements, try a crop containing the most distinctive object, building, person, or sign. Search results may reveal older versions, news reports, photographer credits, stock-photo pages, or completely different captions.
Pay close attention to dates. Suppose a photograph is being shared as evidence of an event that happened yesterday, but you find the same image published online three years ago. You have learned something important without examining a single pixel.
You can also compare the wording used with earlier appearances. If older pages describe the image as a protest in one city while the current post claims it shows a protest somewhere else, the problem is probably context rather than image manipulation.
This is one reason I prefer tracing an image before obsessing over tiny visual defects. A perfect-looking fake can fool your eyes, while a 15-second search can reveal that the supposedly new image has been online for years.
The final 30 seconds: inspect what the file can tell you
If the image still matters after the first checks, look at the file itself. This is where metadata and basic image forensics can add another layer of evidence.
Metadata may contain information such as the camera model, capture time, exposure settings, GPS data, and editing software. When useful metadata survives, it can expose a contradiction. A photo claimed to have been taken yesterday might contain an old capture date or software information showing that the file was edited.
But do not make the opposite mistake and assume missing metadata means the image is fake. Social platforms and image-sharing services commonly strip metadata when files are uploaded or processed. Screenshots also create new image files, so the metadata belongs to the screenshot rather than the original photograph.
That means metadata is evidence, not a verdict. Existing information that contradicts the story deserves attention. Missing information usually tells you very little.
You can also look at the image itself for obvious editing clues. Check areas where objects meet, especially hair, hands, signs, text, faces, reflections, and repeated patterns. Look for impossible shadows, inconsistent lighting, strange edges, duplicated objects, or details that do not make physical sense.
Do not turn this into a hunt for the famous "six fingers" or distorted ears, though. Image generators have improved quickly, and a convincing AI image may not contain an obvious visual mistake. The absence of a visible glitch is not evidence that an image is authentic.
When your eyes are not enough, use image analysis
Sometimes the basic three-minute routine leaves you with a genuine question: the source is unclear, reverse search finds nothing useful, and the image still looks suspicious. That is when a forensic image tool becomes useful.
Fake Image Detector can give you two useful layers of evidence from an uploaded image: Error Level Analysis and metadata analysis. ELA examines differences in JPEG compression that can appear when parts of an image have been edited and saved differently from the surrounding areas. Metadata analysis looks at the information stored inside the file.
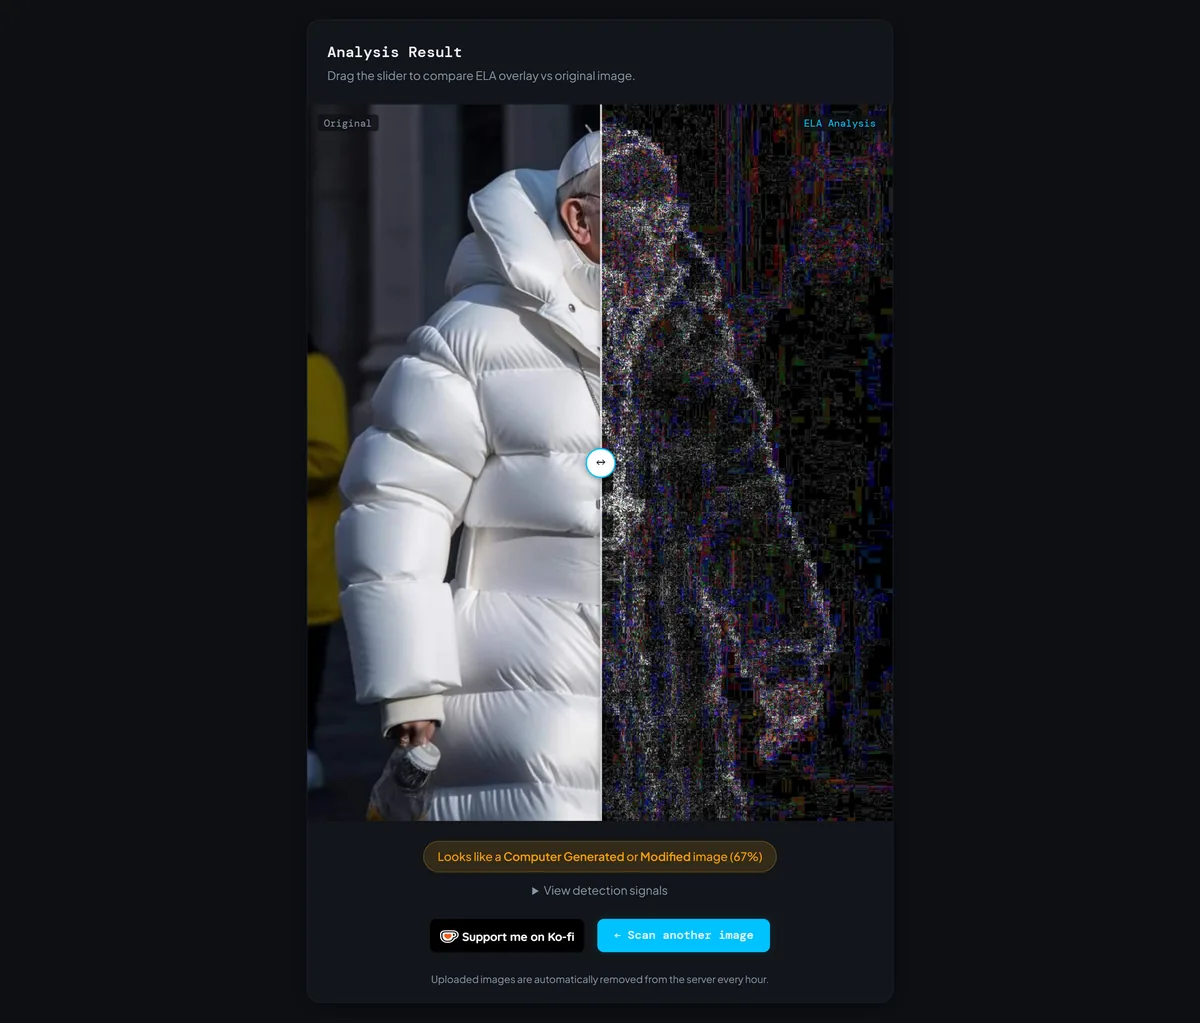
The important word here is evidence. An ELA result does not automatically mean someone created a fake image. Different editing workflows, image formats, compression levels, and re-saving can produce unusual patterns. Likewise, clean metadata does not certify that a photograph is authentic.
AI-generated images add another complication. A fully synthetic image may not contain the kind of splice that ELA is designed to reveal. That is why you should not treat one forensic technique as a universal fake detector. The strongest habit is to combine different kinds of evidence: source, context, history, file information, and image analysis.
If you want a practical extension of your three-minute routine, use the detector on one image each day while you are building the habit. You will quickly get better at understanding what the different signals actually look like instead of treating every bright patch or missing metadata field as proof of something.
Turn the routine into a simple daily decision
You do not need a complicated scoring system, but a simple decision rule helps. At the end of your three minutes, put the image into one of three buckets: verified enough to share, needs more checking, or do not share.
"Verified enough" does not mean you have mathematically proved every detail. It means the source, context, image history, and available evidence tell a consistent story. "Needs more checking" means something important remains unresolved, such as an unknown origin or conflicting dates. "Do not share" is appropriate when you have strong evidence that the image is manipulated, miscaptioned, or being used to support a false claim.
This is much more practical than trying to reach absolute certainty. Online images often arrive without their original file, photographer information, or complete history. Waiting for perfect evidence can mean you spend 30 minutes on a post that needed a simple "I am not sure, so I will not share this."
A good verification habit is therefore conservative without becoming cynical. You should not call every unusual photograph AI-generated. You should not dismiss genuine eyewitness evidence because the image has no metadata. And you should not trust an image simply because it looks natural.
The goal is not suspicion. The goal is proportionate confidence.
Practice with ordinary photos, not just viral fakes
A useful habit becomes much easier when you practice before you actually need it. You do not have to wait for the next political scandal or breaking disaster to test your skills.
Pick an ordinary image from a news site, a public post, or an old photo in your own collection. Try to identify its source. Run a reverse image search. Inspect its metadata if you have the original file. If it is a JPEG, see what an ELA view looks like. Then compare what the tools told you with what you already know about the image.
This is especially useful because a known real image gives you a control. You start learning that metadata can be absent from an authentic photo, that editing software can appear in an authentic newsroom workflow, and that compression artifacts do not automatically mean somebody fabricated the scene.
You can also practice with images you know have been edited. Save a JPEG, make a small change, save it again, and compare the original with the edited version. Seeing how a controlled change affects an ELA result is far more useful than memorizing a list of supposed "fake image signs."
A daily habit should take three minutes, not thirty
There is a temptation to turn image verification into a giant research project. Resist it. The value of the habit comes from making it small enough that you will actually repeat it.
Think of the three minutes as a filter. The first 30 seconds stop the automatic reaction. The next minute checks the source and context. The next minute traces the image backward. The final 30 seconds give you a quick look at the file and tell you whether a forensic tool is worth using.
Most images will not need more. A few will. When one does, you already have a starting point instead of staring at the screen wondering what to do.
That is also why this habit works better than trying to memorize every new AI artifact. The specific tells will keep changing. The questions stay useful: Where did this come from? What does it actually show? Has it appeared before? What evidence supports the claim? Does the file tell a consistent story?
FAQ: Building a daily habit for spotting fake news photos
Do I need special software to spot fake news photos?
Can I tell if a photo is AI-generated just by looking at it?
What if a photo has no metadata?
How often should I practice the three-minute routine?
Your three-minute photo verification checklist
Use this sequence whenever a news photo feels important enough to verify:
Pause. Do not share the image while you are reacting to it.
State the claim. Write down exactly what the photo is supposed to show.
Check the source. Find out who posted it and whether they provide context.
Check the details. Look at dates, locations, signs, landmarks, clothing, vehicles, and other visible clues.
Search backward. Run a reverse image search and look for older appearances or different captions.
Inspect the file. If you have the original, check metadata and look for contradictions.
Analyze when necessary. Use Error Level Analysis or another appropriate image check when the basic evidence is inconclusive.
Make the decision. Share when the evidence is consistent, investigate further when it is not, and do not share when you have strong reason to believe the claim is false.
The important part is doing the steps in roughly the same order. A routine removes the need to invent a verification process every time you encounter a suspicious image. It also keeps you from jumping straight to the most technical tool when a simple reverse image search could answer the question faster.
What to do next
The easiest way to start is today. Find one news photo that caught your attention, set a three-minute timer, and work through the checklist without trying to prove anything you cannot actually establish. Notice which step gives you the most useful information.
Then do it again tomorrow. You will start recognizing the difference between a photo that needs serious investigation and one where the caption is the real problem. More importantly, you will create a small pause between seeing something and believing or sharing it.
If you want to make the technical part of the routine faster, upload a JPG to Fake Image Detector and compare the metadata and Error Level Analysis results with what you discovered from the source and image history. Treat the result as another piece of evidence, not a magic answer. The more often you compare different signals, the better you become at judging what a suspicious image can actually prove.
The next time a shocking photo appears in your feed, give it three minutes before giving it your trust. That tiny habit can make a much bigger difference than trying to become an expert at every new kind of fake.