The strange part of the deepfake era isn't that fake photos look real. It's that real photos now get accused of being fake. Post an honest holiday snapshot with slightly odd lighting and someone will call it AI within an hour. That's an annoyance if you're an amateur photographer, and a serious problem if you're a journalist, a seller, a claimant, or anyone whose photo is evidence of something that actually happened. This guide covers how to sign your own photos so you can prove they're real, using tools that cost nothing and take about ten minutes to set up.
What Signing a Photo Actually Proves and What It Can't
A signature proves two narrow things: the file came from the source named in it, and not one pixel has changed since. That's powerful in a specific way and useless in every other way. It's tamper evidence, not a truth detector.
Your camera will happily sign a photo of a screen displaying an AI image. The claim you're making when you sign is "these are the bytes I captured, unaltered, and I'm attaching my name to them." That's a claim you can defend. "This photo is true" is not something any cryptography on earth can deliver, and anyone selling you that is overselling.
The reverse matters too. A photo with no signature proves nothing bad. Almost every image ever taken is unsigned, including the one your grandmother shot in 1987. Signing doesn't make unsigned photos suspicious. It just means that when someone challenges you, you have something to hand over besides your word.
A signature doesn't prove your photo tells the truth. It proves nobody has touched it since you pressed the shutter, and that you're willing to put your name on it.
The New AI Rules Label Fake Photos, Not Real Ones
Article 50 of the EU AI Act started applying on 2 August 2026. It requires providers of generative AI to mark synthetic images in a machine-readable format, and requires deployers to label deepfakes, with penalties reaching 15 million euros or 3% of worldwide turnover. Systems already on the market before that date get until 2 December 2026 to meet the marking requirement. Similar labelling expectations are moving through other jurisdictions, and UK, US and Australian businesses serving EU users are already in scope.
Now read that again and spot the gap. Every one of those rules puts a mark on synthetic content. Not one of them puts a mark on yours. As labelling spreads, the quiet default shifts from "assume real unless labelled fake" to "unlabelled means unverified," and that shift lands on you. Nobody is coming to vouch for your camera roll.
That number matters because signing only works if other people can read your signature. A private scheme nobody supports is a diary entry. The C2PA standard behind Content Credentials has backing from Adobe, Google, Microsoft, OpenAI, Sony, Canon, Leica and the BBC, which is why it's the format worth learning.
How to Sign Your Own Photos So You Can Prove They're Real: Pick One of Three Routes
There's no single button for this yet, so pick the route that matches the gear you own and the level of scrutiny you expect. Route 1 is strongest and needs supported hardware. Route 2 works on any photo you've already taken. Route 3 works with literally any camera made in the last twenty years and costs nothing. Serious documentation work uses all three together.
| Route 1: Sign at capture | Route 2: Sign in browser | Route 3: Hash and timestamp | |
|---|---|---|---|
| Cost | Free, if your device supports it | Free, no subscription needed | Free |
| Setup time | About 5 minutes, one-time | About 10 minutes, one-time | Under 2 minutes per file |
| What it proves | This device captured these exact bytes at this moment | This person published these exact bytes, unaltered since | This exact file existed before this date |
| Hardware required | Leica M11-P, M11, Q3, SL3; Sony Alpha 1 II, Alpha 9 III; Canon EOS R1, R5 Mark II; Google Pixel 10; or ProofMode on any phone | Any computer with a desktop browser | Anything, including old point-and-shoots and scanned prints |
| Best for | Photojournalism, evidence gathered on location | Creators publishing work under their own name | Disputes, claims, and proving you had it first |
| Weak spot | Off by default, and certificates can be revoked | Proves publication, not capture | Proves timing, not authorship |
Route 1: Turn On Content Credentials in the Camera You Already Own
Signing at the moment of capture is the strongest version of this, because the signature attaches before the file ever touches a computer. Leica shipped it first in the M11-P back in October 2023, using a dedicated on-device security chip, and later brought it to the M11, Q3 and SL3. Sony supports it on the Alpha 1 II and Alpha 9 III, with firmware reaching older Alpha bodies. Canon added it to the EOS R1 and EOS R5 Mark II through firmware in July 2025, then launched its Authenticity Imaging System in May 2026 to handle certificates and trusted timestamps for newsrooms.
If you don't own a professional body, the cheapest way in is the Google Pixel 10, which signs every photo taken with the stock camera app. No Pixel either? ProofMode is free and open source, runs on iOS and Android, signs each capture with your own keypair, and adds sensor data plus third-party notarisation. The Android version passed C2PA conformance testing in May 2026, which means other tools can now read what it produces.
One cautionary tale keeps me honest about all this. Nikon added C2PA to the Z6 III by firmware in 2025, then suspended its Authenticity Service after a signing vulnerability turned up, revoking every certificate it had issued. That service still hadn't returned as of mid-2026. Camera signing is real, but it depends on a company's key infrastructure staying sound, which is exactly why I never treat it as my only layer.
Route 2: Sign Photos You Already Took, Free, in Your Browser
Adobe's Content Authenticity web app is free, needs no Creative Cloud subscription, and runs in a desktop browser. You upload up to 50 JPG or PNG files at a time, each under 20MB, then choose what to attach: your name, connected social accounts, and a preference asking generative models not to train on your work. You can verify your identity through a trusted partner so the name in the credential carries weight rather than being self-declared.
The honest limitation: signing after the fact records that you published this file, not that a camera captured this scene. A camera signature says "this sensor made these bytes." A post-hoc signature says "this person stands behind these bytes." Both are useful, and they're not the same claim. Apply credentials before you publish, because you can't retroactively attach them to something already sitting on a platform.
A habit worth building: before you attach your name to anything, check what a stranger would see when they inspect it. Drop the file into a free forensic tool like Fake Image Detector, which runs Error Level Analysis and reads out the metadata in seconds. If the compression pattern or the metadata says something you didn't expect, you want to know that before your signature is on it, not after.
Route 3: Hash and Timestamp Any Photo From Any Camera
This is the route almost nobody writes about, and it's the one I'd reach for first if I had a photo that might end up in a dispute. You compute a SHA-256 hash of the file, which is a 64-character fingerprint that changes completely if a single bit changes, then anchor that fingerprint to a public timestamp. Now you can prove this exact file existed before this exact moment, which quietly kills the "you fabricated that afterwards" argument.
OpenTimestamps does this free, with no account. Your photo never leaves your machine because the hash is computed locally and only 32 bytes go to the network. You get back a small .ots proof file, which anchors to the Bitcoin blockchain and typically confirms within a couple of hours. Store that proof file beside the photo and back up both together. If you prefer the command line, shasum -a 256 photo.jpg works on Mac and Linux, and certutil -hashfile photo.jpg SHA256 does the job on Windows.
What makes this route quietly excellent is that it works with a 2011 point-and-shoot, a scanned print, or a screenshot of your own security camera feed. No hardware requirement, no vendor, no certificate authority that can revoke anything. A common mistake I notice is people treating this as a replacement for Content Credentials. It isn't. It answers a different question: not "who made this" but "when did this exist."
Keep the Untouched Original, Because That's Your Real Evidence
Every signing method above binds to specific bytes. Change the bytes, break the binding. So the discipline that makes all of this work is boring and unglamorous: archive the straight-out-of-camera file, never edit it, and do your cropping and colour work on copies.
Watch your editing chain too. Any tool that doesn't understand C2PA will strip or invalidate a signed manifest on export, and it won't warn you. Keep originals in a dedicated folder backed up in two places, one of them offline. When someone challenges a photo, handing over the untouched original plus its timestamp proof settles the question faster than any argument you could type.
What Happens to Your Signature When You Post to Instagram
Here's the part that frustrates everyone, so brace yourself. Most social platforms re-encode every image at upload, and metadata that isn't deliberately carried across dies in the process. Meta reads Content Credentials and keeps a server-side record for its own AI labelling, but the file other people download carries neither EXIF nor a manifest. LinkedIn is one of the few platforms that preserves and displays credential chains through upload. TikTok reads credentials to auto-label AI content and attaches its own.
Three workarounds actually help. Send the signed file through WhatsApp as a document rather than as a photo, which transmits the original bytes untouched, though be aware that also transmits GPS data you may not want to share. Host the signed original somewhere you control and link people to it. And where the option exists, use durable Content Credentials, which pair the manifest with an invisible watermark and a fingerprint so the record can be recovered even after metadata gets stripped.
How Someone Else Checks Your Photo in Under a Minute
Point people at contentcredentials.org/verify, the official tool run by the Content Authenticity Initiative. They drag your file in or paste a URL, and it validates the signature against the C2PA trust list, then displays the signer, the timestamp, the tools used, the edit history, and any AI-generation flag. Adobe's Inspect tool does the same check. Browser extensions show a small "Cr" badge automatically as people browse.
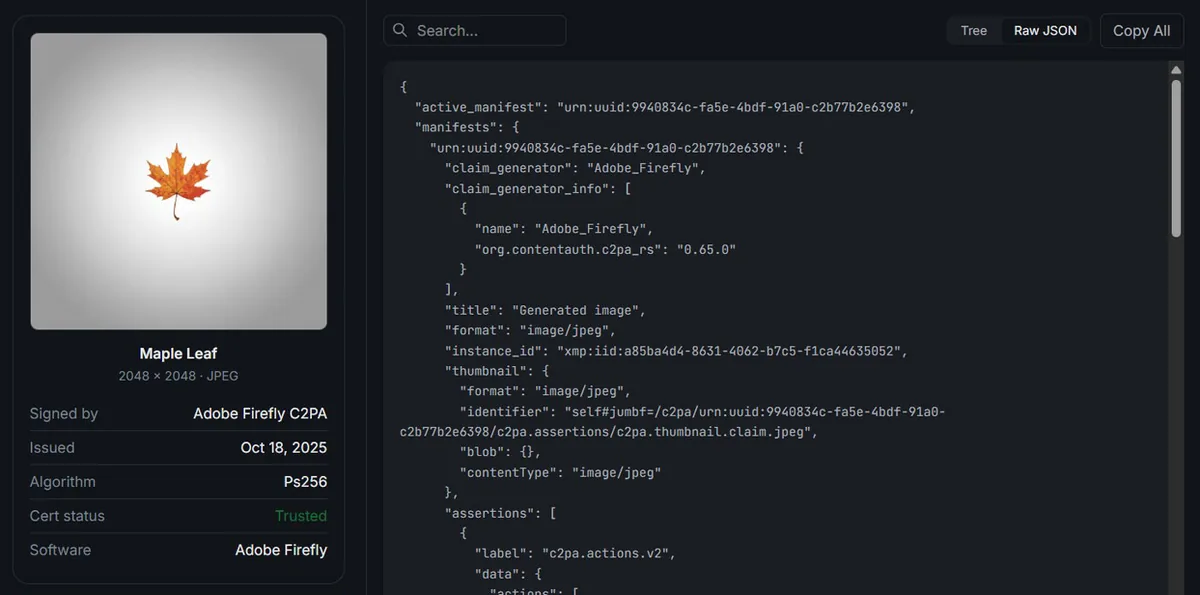
The time to test your proof is the quiet afternoon you set it up, not the day you desperately need it.
Five Mistakes That Quietly Break Your Proof
Editing in a tool that doesn't speak C2PA. One pass through the wrong app and the manifest is gone or invalid, with no error message. Screenshotting your own photo. A screenshot is a brand new file with none of the original's provenance, which is why the screenshot problem remains the biggest unsolved gap in this whole system. Signing the export and deleting the original. The export is a derivative. If you can't produce the source file, you've thrown away your strongest card.
Sharing only through channels that strip everything. If the recipient downloads a re-encoded copy, your signature never reaches them. Never testing the verification path. In my experience this is the most common failure by a wide margin. People enable a setting, assume it worked, and discover months later that the credential was never being written. The fix is simple: take a test photo, move it through your normal editing and sharing workflow, then check the final downloaded copy with a C2PA verifier.
Questions People Ask Before They Start Signing Photos
Does signing a photo stop people from stealing it?
Can I sign photos from my iPhone?
Will a signed photo hold up in an insurance claim or a legal dispute?
Does a signature prove my photo isn't AI-generated?
Sign the Next Photo You Take
None of this requires new gear or a technical background. Check whether your camera or phone can sign at capture and switch it on. Sign anything already shot through Adobe's free web app. Hash and timestamp anything that might ever be questioned. Then guard the originals like negatives, because that's exactly what they are.
Start with one photo today, not your whole archive. Take a test shot, sign it, verify it, and see the record appear with your name on it. Then run that same file through Fake Image Detector to see what a sceptical stranger sees when they inspect your work: the Error Level Analysis, the metadata, the whole picture. Knowing what your photos say about themselves is the part most people skip, and it's the part that makes everything else worth doing.