Somewhere between your LinkedIn headshot, your employer's "meet the team" page, and a race photo from three summers ago, there are probably enough clear pictures of your face online to train a model that can generate you doing things you never did. That is the uncomfortable part. The useful part is that you can go and look for yourself, and most of what you find can be fixed in an afternoon. This guide covers how to audit your own online photos to protect against AI cloning: where to look, which images actually matter, what to remove, and what to keep on purpose. No paranoia required, just a list and a couple of hours.
What an AI Cloner Actually Wants From Your Photos
Not many photos. That is the part that catches people off guard. Community guides for training a custom likeness model, the kind that generates endless new images of one specific person, typically call for somewhere between 15 and 30 images. What they all stress is not volume but variety: sharp, well lit, high resolution shots from different angles, with different expressions and different lighting.
So twenty photos of you squinting at the same beach in the same sunglasses are close to worthless. Eight photos spread across a studio headshot, a side profile from a wedding, a stage shot from a conference, an ID style photo and a gym selfie are worth far more. Every new angle you publish fills a gap in a set that someone else can assemble for free.
Video is worth even more. Ten seconds of you talking hands over hundreds of frames plus a voice sample, which is why the clip on your company's careers page deserves more attention than your Instagram grid.
A cloner does not need every photo of you. They need about twenty good ones from enough different angles, and most people published those themselves.
How to Audit Your Own Online Photos to Protect Against AI Cloning Without Deleting Your Life
The point of this audit is not to erase yourself. That is impossible for most people, and for anyone who needs to be findable professionally it costs more than it saves. The point is to make yourself a poor, slow, expensive subject to fake.
Those are only the cases where victims realised AI was involved, which the FBI itself flags as a fraction of the total. For an ordinary person the threat is rarely a Hollywood grade video. It is a dating profile wearing your face, a cloned account asking your friends for money, an explicit image built from a holiday photo, or your likeness selling a supplement you have never heard of.
Budget about two hours for the first pass. You need a browser, your phone, and a notes document to record what you find. Steps one and two are the slow parts, and everything after that is decisions.
Step 1: Map Every Place Your Face Lives Online
Write the list before you delete anything. Almost everyone underestimates how many places their face has ended up, and the surprise is hardly ever their own social accounts.
Work through four groups. First, accounts you control: social profiles, professional networks, a personal site, marketplace listings, dating apps, forum avatars, abandoned blogs. Second, accounts controlled by people close to you: partners, parents, adult children, friends who tag you. Third, organisations: your employer's team page, a conference speaker bio, a university news post, a sports club gallery, a gym or dance studio, an estate agent listing with your family in the kitchen, a wedding photographer's portfolio. Fourth, public and press: local news photos, event galleries, business review pages, anything a search engine has indexed.
What I notice most often is that group three is where the volume hides. People spend an hour tightening Instagram privacy settings and never notice the 4,000 pixel wide headshot their employer published in 2021 and never took down.
Step 2: Search for Yourself the Way a Stranger Would
Search before you decide anything, because you are cataloguing what a stranger can reach, not what you remember posting. Use a private browser window so your own login history does not colour the results.
Run a few passes. Search your name in quotes, then your name plus your town, employer, university and club. Switch to the Images tab, which surfaces what the web results bury. Then reverse image search your most public photo (Google Lens, Bing Visual Search and TinEye all do this free) to find every site that reposted it. Facial recognition search engines such as PimEyes match a face rather than a file, and the ones that offer that search also publish an opt out form worth submitting while you are there.
Set up Google's Results about you hub while you are at it. It monitors Search for your contact details and, since a February 2026 update, government issued ID numbers, and the same hub now handles removal requests for non-consensual explicit images.
Step 3: Rank Each Photo by How Useful It Is to a Cloner
Score what you found, because most of those images do not matter and a small handful matter enormously.
High value to a cloner: your face fills a decent part of the frame, it is in focus, evenly lit, front facing or at a clean three quarter angle, unobstructed by sunglasses or a hat, and the file is large. Low value: group shots where your face is a hundred pixels wide, motion blur, harsh shadow, steep angles, heavy filters, and anything a platform has already compressed to death.
Flag the unusual ones too. Photos against a plain wall, passport style images and professionally lit headshots are the most useful pictures of you on the internet from a cloner's point of view. That is exactly why so many fake profiles are built out of LinkedIn portraits.
Step 4: Cut the Variety, Not Your Entire Online Presence
Now do the removals, strategically rather than exhaustively. Deleting nine photos of the same pose achieves nothing. Deleting the single profile shot that covers an angle nothing else covers achieves quite a lot.
Four moves pay off most. Pick one public headshot and use it everywhere instead of a different photo per platform, since sameness gives a model nothing new to learn. Publish it small, because six hundred pixels wide is plenty for a profile picture. Delete dormant accounts outright rather than just clearing the avatar. Then bulk restrict old posts and switch on tag review so nothing new appears without your approval.
If you want to see what a stranger can pull out of one of your public photos, upload it to the free checker on this site. It runs Error Level Analysis and reads whatever metadata survived, in a few seconds, which makes the next two steps considerably less abstract.
Step 5: Chase Down the Photos Other People Posted of You
This is the part most guides skip, and it is usually more than half the material. You have less control here, so tone matters more than legal firepower.
Start with the easy wins. Untag yourself, then message the friend or relative directly and name the specific photo rather than asking them to guess. For organisations, a short polite email to whoever runs the site works more often than people expect, especially with clubs, schools and small employers who never meant to keep a page live this long.
In the UK and the EU you have a stronger hand. GDPR and UK GDPR give you a right to request erasure of personal data, and photographs count, with the organisation normally expected to respond within a month. Australia, New Zealand and Canada have privacy regimes covering personal information that work differently in practice. In the US it depends on your state and, mostly, on the site's own policy.
Expect some refusals. A photographer owns copyright in their own images, so outside a privacy law claim you are making a request, not issuing an instruction. When a page comes down but the picture still shows in results, Google's remove outdated content tool clears the cached version.
Step 6: Check What Your Image Files Quietly Tell Strangers
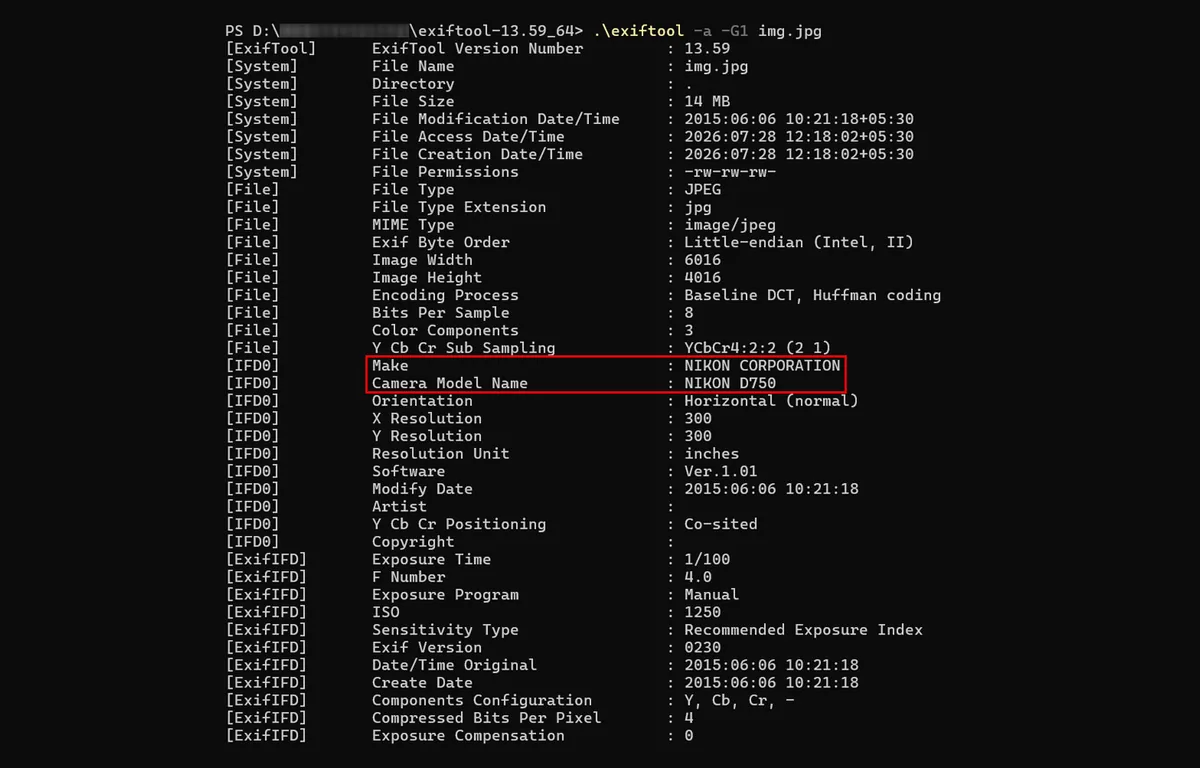
Look inside the files, not just at what they show. Photos carry EXIF metadata: camera or phone model, exact timestamps, editing software, and on many phones by default, GPS coordinates accurate to a few metres.
Large social platforms usually strip most of that on upload. Personal sites, blogs, forums, marketplace listings, shared cloud links and email attachments often do not, which is where the leaks happen.
Location data is the immediate danger, and it has nothing to do with cloning. A photo of your dog in the front garden can hand your home address to anyone who opens the file properties. Switch off location tagging in your camera app, and strip metadata from anything you publish yourself (Windows has Remove Properties under file details, and macOS Preview can do it too).
Step 7: Build a Provenance Folder Before You Need One
Here is the step almost nobody does, and the one with the biggest payoff for the least effort: keep a private folder of your own originals, built before anything goes wrong rather than after.
Save the untouched original of every photo you publish publicly, unedited and with metadata intact, backed up somewhere private. Alongside it keep a plain text log: which file, where you published it, when, and at what size. That is your reference set, and it takes about an hour to assemble.
Why bother? Because when a fake surfaces, arguing is slow and comparison is fast. Your original carries a consistent compression history and real camera metadata, while a generated or heavily edited image usually carries neither. Compression analysis, including Error Level Analysis, tells you far more when you can hold the suspect file against a known genuine one from the same camera. It also gives a platform or a police officer something concrete to examine instead of your word.
If your phone or editing software supports C2PA content credentials, switch them on for anything you plan to publish. Signed provenance travels with the file, and support is spreading through mainstream cameras and editing apps.
The Protections That Work, and the Ones That Only Half Work
Be honest about the tools, because a fair amount of what gets recommended online is closer to comfort than protection.
Visible watermarks deter lazy reuse and do almost nothing against a model, since inpainting removes them in seconds. Image cloaking tools that add imperceptible noise, the Glaze and Nightshade family, were built mainly to protect artistic style. Against face models their effect is inconsistent, and it weakens once a platform resizes and recompresses the upload, or once someone simply screenshots it.
Going private helps, but only going forward. It does nothing about what is already indexed, screenshotted or sitting in someone else's camera roll, and your followers can still save whatever they can see.
You cannot delete your way to safety. You can make yourself a slower, poorer, more expensive target than the next person along.
What actually works is unglamorous: fewer public images, smaller files, less angle variety, tag control, a provenance folder, and a family verification habit. Agree a spoken code word with your parents and your children now, to be used on any call asking for money or urgent help. It costs nothing and it defeats a voice clone, which is the version of this attack most families will actually meet.
What to Do If a Cloned Image of You Already Exists
Record first, report second. Screenshot the content, the profile and the full URL before you file anything, because a successful report can make the evidence vanish before you have captured it.
Then take the fastest route available where you live. In the US, since 19 May 2026 covered platforms have been legally required to remove non-consensual intimate images, including AI-generated ones, within 48 hours of a valid request, with the FTC enforcing it. In the UK, creating or requesting a non-consensual intimate image became a criminal offence on 6 February 2026 under the Data (Use and Access) Act 2025, on top of the existing offence for sharing one. In Australia, the eSafety Commissioner can issue removal notices under the Online Safety Act.
Wherever you are, StopNCII.org generates a hash on your own device, so the image never leaves your phone, and participating platforms use that fingerprint to find and block copies. For fakes that are not intimate, such as a dating profile using your face, report it as impersonation and separately request removal of the image from Google Search using the three dot menu on the result.
None of this is legal advice, and these rules are moving quickly across every country covered here, so check the current position where you live before relying on it.
Questions People Ask Before They Start
How many photos of me does someone need to make a convincing fake?
Should I delete my LinkedIn photo?
Does making my accounts private actually protect me?
How can I tell whether an image of me is AI-generated or edited?
Where to Start This Week
Block out ninety minutes and do only steps one and two. Build the list, run the searches, and write down what you find without deleting a thing. Nearly everyone finishes that first pass with three or four images they had completely forgotten about, and those are almost always the ones worth acting on.
Then take your most public photo, the one a stranger would reach first, and upload it to the free image checker here. Seeing the Error Level Analysis view and the surviving metadata for your own face makes the rest of the cleanup obvious. Put a reminder in your calendar for the same week next year, and after anything that generates a lot of photos: a wedding, a new job, a conference. An audit you repeat beats a purge you do once.